December 25, 2014

Merry Christmas!

From my home to yours,
wishing you a very Merry Christmas
and a joyous holiday season!


Take gentle care,

Sue

December 23, 2014

Weekly Deals and More Clearance Items!

Hi all,

I don't know about you, but this week, I am totally confused on what day it is. 'Tis the season I guess! The hard drive on my laptop died, so I'm sharing the desktop with my 16 year old gaming son who, as of tomorrow, will be on vacation - could be a conflict there. I am always amazed when I realize how dependent I am on my tech toys!  I am basically ready for Christmas, just have my food items to prepare and a batch of cookies to bake for my brother's gift - how about you? I'm hoping my last two packages show up today, but I'm not holding my breath. One of them is my son's big gift. I'll wrap a photo of it and we'll go from there. I'm really working on not making myself crazy over all of the rush of the season.

I have a very special gift coming on Saturday - my great nephew, Jaxon, from Louisiana! Jaxon and Megan, his mom, are flying up on the 27th and staying 'til the 7th. My nephew will be working mega hours, so Megan is taking a northern vacation. Jax is 10 months old and a little snuggle bug; I can't wait to get my hands on him again! Their trip motivated me to do a major  cleaning of the lower level of my house. The inn is ready for business!

Looking to do some last minute shopping for yourself? Check out this week's deals.

I've been eyeing up the Be the Star set for awhile - guess this is as good a time as any to scoop it up!

YEAR END CLEARANCE! Check out the year end clearance items here. LOTS of items from the current holiday catalog, paper, stamp sets and accessories. 

Last night I made tags for my gifts. I'll share of few of the with you. The penguin to match the paper is my favorite!


Hope all of your holiday preparations are going as planned. Until next time, take gentle care.

Sue

December 22, 2014

Spotlighting Ornamental Pine Thank You

You saw my Christmas cards, here is the complementing thank you note I'll be sending this holiday season.


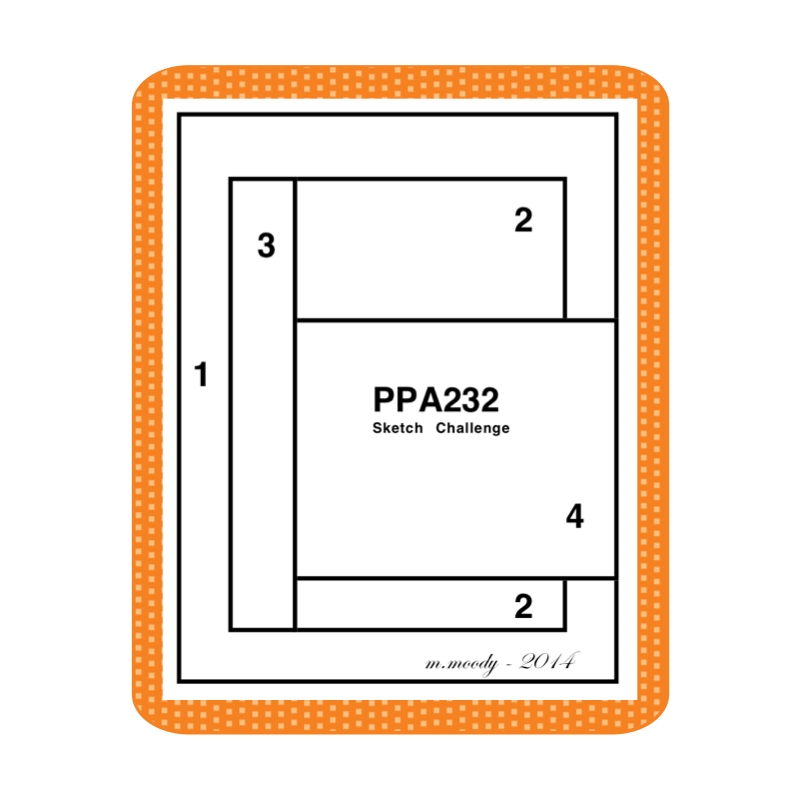
I cased a card from Dawn Griffith using the spotlight technique. I created the stamped image on a piece of 3.75" x 5" Very Vanilla CS. I added a bit of snow using our Signo gel pen. You can't see it in this photo, but I did use a two way glue pen and sprinkled some Dazzling Diamonds on the pine cones. Using the Square Framelits,  I cropped the featured section of the image. From a piece of 4" x 5.25" Early Espresso, I cropped the next size square - when counting from the smallest to largest, I used the 3rd and 4th squares. Because I added a layer over the EE, I didn't have to be concerned that anyone would see my gaping square!
So, to put it all together, use a base of 8.5" x 5.5" Very Vanilla sponged with Early Espresso, add your EE layer, then the main image panel. Mount your cropped image to the EE square and adhere to the main image. Very fun effect! 

Based on my blog logo, you may realize that I love pine cones! I have a family room filled with them. It started during one of many visits to friends in Reno and a road trip from Reno to Sacramento. We had to pull off the road to give the dog a break and discovered these HUGE pine cones. Sugar pines; some of them weighing over 2 pounds! 


I can't tell you how many boxes of them I shipped back to Wisconsin. I also collected cones from Donner Pass and hopped a few guard rails to pick up Bristle cones. I even have a teeny tiny pine cone from a redwood in Muir Woods, along with a collection from family owned property. This is definitely a stamp set I'll keep and use often!

If you're not already receiving my blog posts directly in your email, you can sign up in the column on the right.

Thanks for stopping and until next time, take gentle care,


December 21, 2014

Quick and Easy Thank You, Tips for Writing Thank You notes and Blog Candy!


I was raised learning the importance of being grateful and writing notes of thanks for gifts, experiences and overall appreciation is something I've always done. I have coached my son to do the same and I have to say, the kid can write a mean thank you note!

TIP: Do you struggle with writing thank you notes? 

Write about how you will use the gift.
Was this a hard to find gift? Send thanks for the time invested in shopping for the gift.
Write about how you felt when you opened the gift.
How you will spend the gift card.
If the gift was an experience, a sporting or performing arts event, share the best part of the event - seeing your first grand slam or seeing your favorite player, the best song in the show, the most striking piece of art, the movie you went to see and who you took with you, you get the idea!
Not your favorite package? Give thanks for the thoughtfulness/generosity of the giver.

The notes don't have to be long, but should be from the heart.

What better way to show thanks than with a hand crafted card! I'm working on using my scraps of Christmas paper - there is a use for every piece! I cased this layout from Kadie Labadie.

This card came together in a snap; Stampin' Up! punches to the rescue! You can make a stack of these in no time flat. You're thinking, ' easy for her to say'? If you need thank you notes and time is your adversary - and it is for most of us at this time of year - leave a comment below and tell me about the best gift you ever received. I'll choose one random comment and send off six of these thank you notes to the lucky recipient!

Be sure to sign up to follow me by email! My posts will be sent directly to your mailbox so you won't miss out.

Thanks for stopping and until next time, take gentle care,


December 20, 2014

Playing with the Holidays

I love this layout, the tilted layers are a great look for a card and a great way to feature your DSP. To get the snow effect on my stamped image, I used the narrow end of a vintage Versamark pen. Once the embossing was completed, I realized how the Versamark ink spattered and I had more of a blizzard look than a soft snow! The colors used here are Garden Green and Cherry Cobbler. I sponged the edges of the Cherry Cobble layer with Early Espresso. The country plaid paper came from the Trim the Tree paper stack. Cherry Cobbler seam binding ribbon was used for the bow.


TIP for cropping sentiments:

I stamped my sentiment and cropped it with the Word Window punch. To get it perfectly centered onto the piece from the Modern Label punch, I attached the stamped and punched sentiment to a scrap of Garden Green CS and THEN used the Modern Label punch to crop the sentiment. I find this much easier than trying to adhere the sentiment to the CS after it's punched.

Questions? Leave a comment and I'll follow up with you.


Follow by email: Like what you see and learn on my blog? Be sure to enter your email address in the field in the column to the right to have my updates sent directly to your inbox!

Thanks for stopping - until next time, take gentle care,


December 19, 2014

Ornamental Pine Christmas and PPA Challenge

Greetings!

I finally got my Christmas cards in the mail - kind of the bus man's holiday, the stamping lady is the last to get her own cards done! I cased this card from a Founder's Circle share by Cynthia Millan; several additional demos created videos based on this card as well. 


The card really came together easily. The embossing powder and residual sparkles were a bit messy, but well worth the end product! I've received many compliments from recipients!

There is another PPA Challenge today. 


I did two versions because I wasn't happy with the first one I did.


I started with this one, but felt it was a little too busy with the addition of the flowers and I also thought the background was a bit blah, so like any dissatisfied stamper - I started over!


I used an embossing folder to add a bit of interest to the strip on the side and used a vintage stamp (Gorgeous Grunge would also work) to create a background on the base of the card.

Which do you prefer? Leave a comment below. If your comment is chosen in a random drawing, I will send you both of these cards!

Thanks so much for stopping. Enjoy your day!


December 11, 2014

Paint Chip Style

I had some fun with this week's PPA color challenge.


I took one look at this and thought of the paint chip samples you pick up at the hardware store; each color just flows in to the next. So I gathered my paper and here's what I came up with.


I went with a 5 x 5 card. The sentiment is from the photopolymer set, Another Thank You. It has so many ways to show your appreciation. I like the uneven layers on this layout and the candy dots finish it off - clean and simple. Be sure to play along!

We do have a NEW photopolymer set, Snuggles and Smooches, perfect for Valentine's Day. 


Snuggles and Smooches Photopolymer Stamp Set
Tell me what you see, messy circle or flower? Let your imagination be your guide. All photopolymer sets are available while supplies last, so order yours now in my online store.


December 10, 2014

Is This on Your Wish List?


Welcome to the last Pals Blog Hop of 2014. 

This month we want to help you start your holiday wish list by sharing projects featuring our favorite Stampin’ Up! papers, stamps, tools and accessories. Get your wish list ready as you move along through the blog hop.
You may just be starting the blog hop or may have come from  Beth Beard at My little craft blog on the Pals Hop. If you get off track at any time, the full lineup below will help you move along from blog to blog so you see all of the project.
The item for every wish list according to Sue? Embossing folders!

Embossing folders add that extra zing, the subtle difference, the perfect pop. They can take a project from okay to WOW!! You can mix them, match them, invert them, ink them. They complement our stamps and papers. In a word, embossing folders are awesome! The folders can be used with the Big Shot or if that is not in your tool box or Santa's budget, another great tool is the convenient Texture Boutique Machine for only $29.95!

Embossing folders are a must have and Stampin' Up! has designs to fit everyone's tastes. Which ones are in your tool kit?


The next stop is Lisa Ann Bernard at Queen B Creations on the Pals Blog Hop! Thanks for visiting and I hope to see you in 2015!

                                     2014dechop_next

  1. Michelle Gleeson at StampinMojo
  2. Shannon Hokanson at Paper Works by Shannon
  3. Dawn Tidd at Tiddbits from Dawn
  4. Sherrie Gross at Stampin Sunshine
  5. Beth McCullough at Stamping Mom
  6. Kalyn Shubnell at The Stamping Chronicles
  7. September Gray at www.septembergray.com
  8. Debbie Mageed at Secret Stamper
  9. Patti MacLeith at Papercrafts by Patti
  10. Nancy Gleason at MyStampinSpace
  11. Maggie Mata at Maggie Made Cards
  12. Debbie Crowley at expressivelydeb...
  13. Wendy Klein at Doggone Delightful Stampin'
  14. Amy Whelan at Amy's Inklings
  15. Brian King at Stamp with Brian
  16. Amy Williams at Stamps and Spice
  17. Mary Fish at Stampin' Pretty
  18. Pamela Sadler at Stampin Pink Rose
  19. Jackie Diediker at Stampin' Jackie
  20. Candy Ford at Stamp Candy
  21. Susan Lankford at Stamp and Create With Susan
  22. Peggy Noe at Pretty Paper Cards
  23. Nicole Watt at Pixel Maven's Retreat
  24. Amy Hoptay at Inking of You!
  25. Lynn Kolcun at Stamping with Avery's Owlery
  26. Beth Beard at My little craft blog
  27. Sue Becker at RnR Stamping - You Are Here!
  28. Lisa Ann Bernard at Queen B Creations
  29. Kerry Willard Bray at Peonies and Paper Chains
  30. Rae Harper-Burnet at WildWestPaperArts.com
  31. Deb Cozzone at Deb Cozzone's Stamping Zone
  32. Debra Simonis at Deb's Stampin' Grounds
  33. Susan Itell at Simple Stampin
  34. Jane Knudsen at see jane stamp
  35. Katy McGloin at Just Fun Stamping
  36. Martie Pollard at The Crafty Bandit
  37. Natalie Bradley at Natalie Bradley Events
  38. Becky Volpp at InkBlossomWithBecky

December 9, 2014

Kid's Cards and Weekly Deals

Hi All,

I had a friend call and ask me to make cards for her grandchildren. I'll share samples throughout the week. I did CASE (copy and share everything) them. There are so many fabulous ideas out there - no reason to reinvent the wheel!


For the Lego fan in your circle of friends and family. I used Daffodil Delight, Pacific Point and Real Red for this primary card. A vintage sentiment was colored using markers. The Lego blocks are 3/4" and I used the 1/4" circle punch. I love the bright colors!


My friend also wanted a Christmas card for this little Lego fan, so I pulled out my blocks and started building! 

I used the Large Polka Dot Embossing Folder for the background and like how the banner greeting pops off the page.

Do you have a Lego fan in your life? Start punching out your circles and have some fun with these layouts!


The holidays are coming and many of you are in full shopping mode, so be sure to check out this week's deals. I'm eyeing up the Hexagon Punch. I don't have that one and it's perfect for making banner ends on your sentiments. If you don't own the Envelope Liner Framelits, now is a good time to add them to your toolbox. Gift card holders can be made quick as a wink and oh so cute. 

Also be sure to check out the Clearance Rack for year end closeouts - there are still LOTS of great deals to be had!


Click on the photo to right to my online store.

Be sure to stop back tomorrow for the Pal's Blog Hop featuring products to add to your wish list!

Thanks for stopping and until next time, take gentle care,


December 7, 2014

Year End Clearance!

Looking for some great deals? Check out the year end clearance in my online store. Sale items include product from the current holiday catalog. Stock up and save!

Year-end closeouts. Save on great products with up to 80% discounts! Save now!

Click HERE to shop!

I'm working on treats from my mom's friends, special order Christmas cards and my own Christmas cards! I'll be sure to post photos throughout the week.

Make today a great day!

December 4, 2014

Another PPA Challenge!

Welcome to PPA Challenge 230. This week we have a color challenge.


Looking at these colors makes me want to mix up a batch of gingerbread cookies! They are yummy - the cookies AND the colors!

It didn't take long for me to pull this challenge card together.


I knew I wanted to do something with a torn edge, so started looking through my stamps to find an image that would work, Mingle All The Way to the rescue! The image was stamped in Baked Brown Sugar and colored in with Cherry Cobbler and Old Olive Blendabilities. Baked Brown Sugar ink was used with the Woodgrain stamp on Baked Brown Sugar paper. I found a vintage berry stamp that I used to give my Cherry Cobbler base a bit of texture. The finishing touch was the bow made from Cherry Cobbler Seam Binding ribbon. 

Last night I attended the Sale-a-Bration catalog premier - lots of goodies  in store for you in January! For those not familiar with Sale-a-Bration (SAB), it's one fabulous sale where you can choose a SAB catalog item for FREE with each $50 purchase. If you would like to receive your own SAB catalog, send me a quick email or leave a comment below and I'll get one in the mail to you.

Thanks for stopping and until next time, take gentle care,

December 2, 2014

Happy Anniversary

Today, one of my besties, Nan, and her spouse celebrate 36 years of marriage. Nan and I were in the hospital nursery together when we were born, were classmates from 5K through high school and MOH (maid of honor) for each other's wedding. You really can't go back much further than that in a friendship! December 2, 1978 we had a horrible snow storm here in southeaster Wisconsin. Following the grand march, the police came into the hall and told everyone to go home; quite the memory!

Here is the CASEd card I created for them.


Apothecary Art is a set I often go to for wedding, anniversary, get well and sympathy cards. There is just a soft, elegant feel to this set. The Labels Framelits provide the perfect backdrop. I used markers in Always Artichoke and Elegant Eggplant to color my stamp. After giving it a good "huff" and transferring it to Whisper White, I used a Blending Pen to color the flowers with Wisteria Wonder and Elegant Eggplant. The layer features the Beautifully Baroque embossing folder. A popped up vintage sentiment, pearls and some organza ribbon complete the look.


Happy 36th Nan and John - and many more!

I love to read your comments. For those of you who are married, how many years has it been? Please comment below!


Shop my online store at www.RnRStamping.com