February 26, 2015

You Rock!

Yeesh! What a week! I started a new job at the beginning of the month and after 3 weeks I think people figure I've got it down solid - not so much!! I have very little patience with my slow speed and need to ask a bazillion questions. Being new is just exhausting, but exhilarating at the same time. 

Today's card is dedicated....to me! I have to stop being so hard on myself and celebrate the knowledge I have gained versus what I don't yet know. As an HR professional, I've given this speech to so many new employees over the years, and I need to practice what I preach!

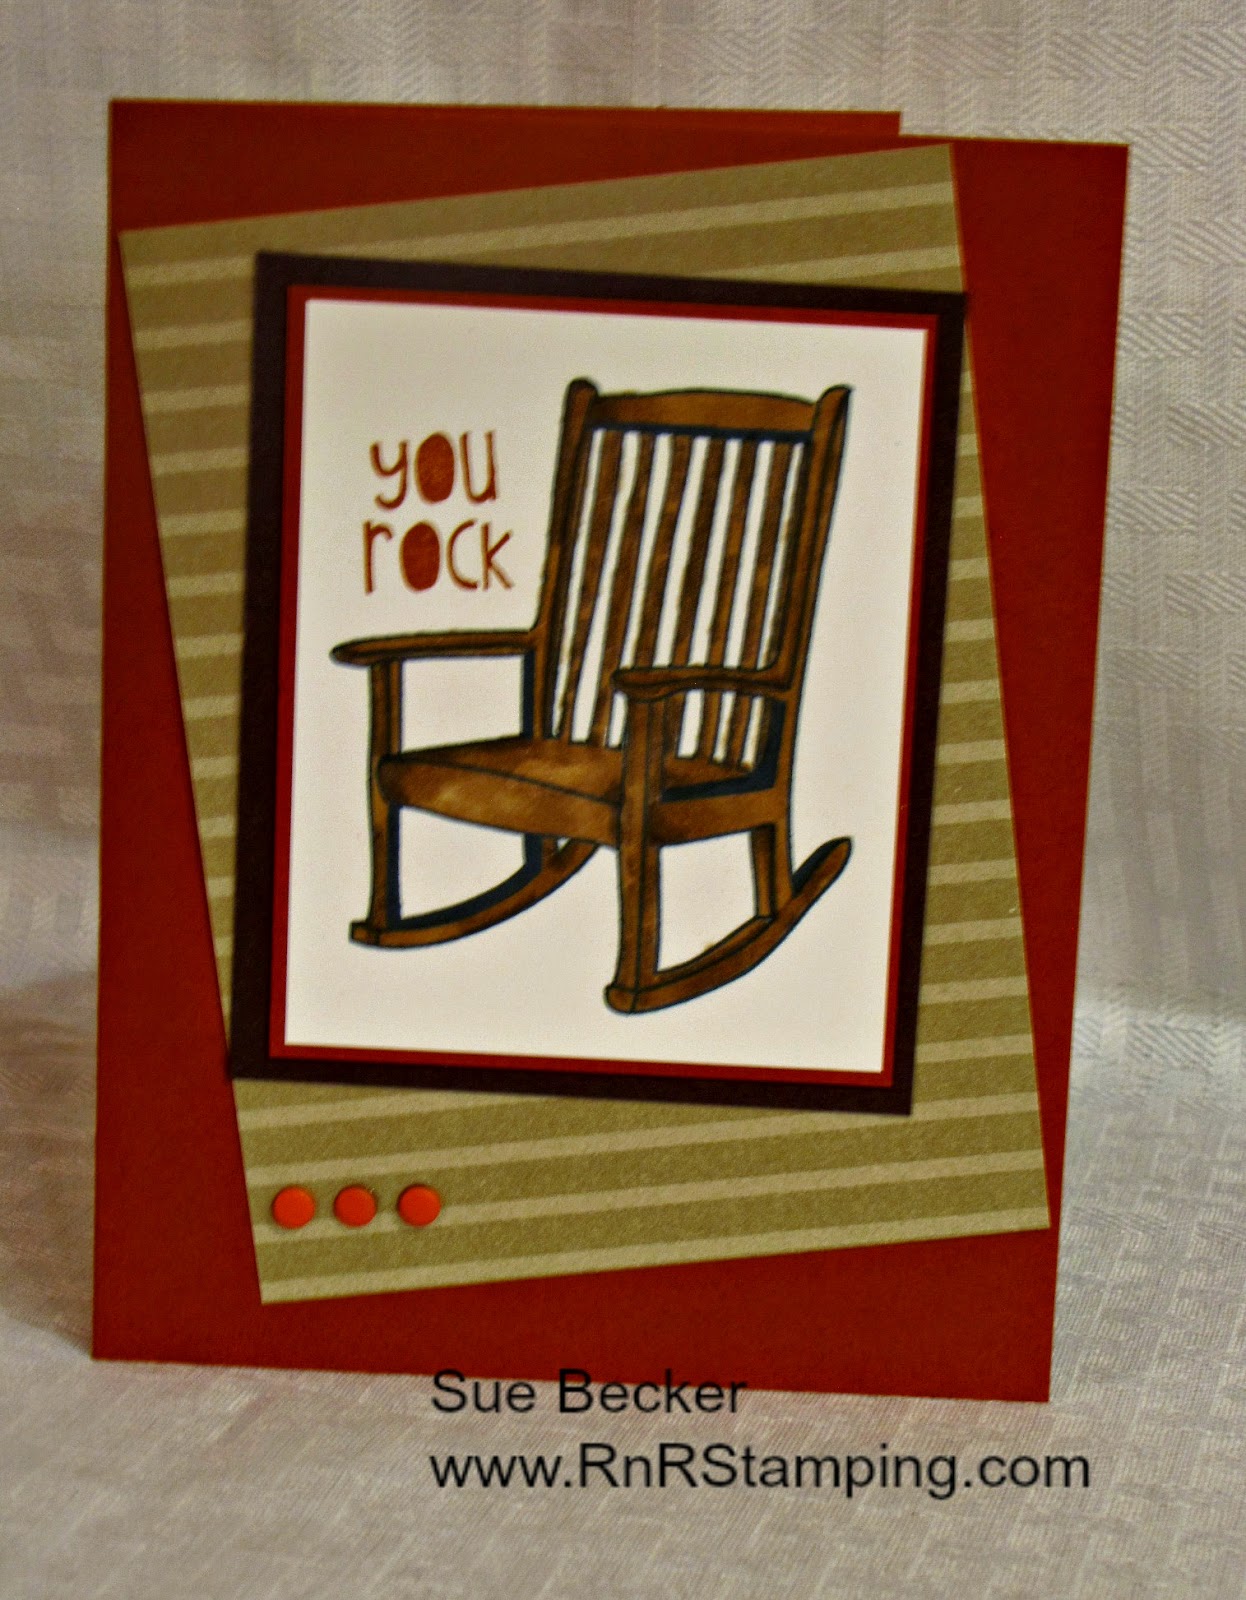
I won this stamp at the SU! convention this summer. I actually received a different one, but one of the Pals traded with me. I think this is such a fun stamp!

I broke out my Crumb Cake Blendabilities and played a bit. The Crumb Cake, Early Espresso and Cajun Craze make a fun trio. The masking technique was used the for sentiment.

TIP: Masking is made easy when using the Stamp-a-Ma-Jig. Use post it notes to mask off the area and stamp away!

TIP: Vary the size and placement of your layers. My tipped version gives a very different look from a standard 4" x 5 1/4".

I'll be honest with you, lining up the Candy Dots against the lines in the DSP was challenging for this woman who likes everything properfly aligned!

I'll be breaking out this single stamp again soon - I'm thinking bright, summer colors with a shining sun. I know I'm ready for summer!

Thanks much for stopping. Stop back for the Pal's Paper Arts challenge.

Stay tuned to my blog for my 150th post! There will be blog candy. Not automatically recieving my blog in your mailbox? Enter your email address in the field in the right column. It's fun knowing what I enjoy is appreciated by others.

Make today a great day and until next time, take gentle care,

Sue

February 25, 2015

Weekly Deals and NEW Sale-A-Bration Items!

What has 204 feet of twine, 20 yards of ribbon, 18 pennants, and 750 sequins?


FREE March 1st with a $50 order!


Click flyer photo for a larger, printable version.

Click HERE to shop my 24/7 online store!

Thanks for stopping. Have a great day!

Sue


February 23, 2015

Bokeh Technique

Hi all!

Had a great morning yesterday, stamping with friends. A request was made to learn the Bokeh technique. Bokeh, pronounced either BOH-kay or BOH-kÉ™, is a photography term defined as "the way the lens renders out-of-focus points of light". We made three cards, each with it's own twist.


The first card, we sponged the background with Lost Lagoon, Pool Party and Pear Pizazz. Using a template I created with a 1 1/4", a 1" and a 3/4" round punch, we stenciled with white craft ink. The card on the right has fewer white spots than the one on the left. One of the fun things about this technique is that no two cards are alike.


I wanted to show the group how the same basic background could result in a different look by adding circles of color with a sponge dauber. We used the same color combo that we used for the first card - a little bit different look. The intensity of the color on the card on the left is greater than the one on the right.


I don't have all of the re-inkers, so I went into my stash to find a new combination for the final Bokeh option. I pulled vintage color and papers: Not Quite Navy, More Mustard and Creamy Caramel. For this card, we started with a base of watercolor paper and used re-inker and an aqua painter. The watercolor paper was sprayed down with water using a spritzer prior to laying down color. This technique results in a surprise every time - you never know how the water is going to run. As a final step, I spritzed the base one more time before setting is aside to dry.

TIP: In a hurry? Use your Heat Tool to dry your project. Craft ink takes a bit of time to dry. Especially when using colored in, as in example 2, make sure the craft ink is dry or you'll make a mess of your ink pads!

Instead of using circles for the Bokeh technique on this card, we used stars. You can't see them quite as well in the card on the right, but they do pop in the card with more intense color.

TIP: Your color coach and DSP color combos are great places to determine colors for your projects.

We had a great morning and I'm looking forward our next round of stamping.

As always, if you have any questions regarding today's projects, leave a comment and I'll get back to you as soon as possible.

Comment: Do you have a favorite of the projects that we did? Be sure to leave a comment and share your thought!

To purchase any items used in this project, click on the photo below.

Thanks for stopping and until next time, take gentle care,

Sue


Built for Free Using: My Stampin Blog

February 20, 2015

Happy Birthday Nan!

Do you have a life long friend? One who goes back as far as you can remember? I am blessed to have Nan in my life and today I celebrate her birthday. 


My parents and Nan's parents attended the same high school in our small home town. Nan's mom styled my mom's hair on her wedding day. Years later, our mom's shared a room at the hospital and Nan and I were in the nursery together! You really can't go back much further than that with a friend unless you're a twin! From kindergarten through high school Nan and I were classmates. Between our junior and senior year of high school we travelled through Europe together for a month. We were maids of honor for each other's weddings. Her husband John and I passed notes in study hall in middle school and when he married Nan, he knew he was getting a "two for"! Their children and grandchildren are almost like my own. She's an amazing woman, my Nan!

My project today features Calypso Coral, Crisp Cantelope and Coastal Cabana. I've been on a Blendability streak - playing, really practicing, so I can teach a class in the near future.

For the base of this card I tried a technique new to me.

Tip: Material needed: glossy card stock (retired), clear bag (I used a 1 gallon zip loc), Blendabilities, rubbing alcohol in a spray bottle.

I cut 2 pieces of glossy card stock to 4 1/4 x 5 1/2. One of the pieces I laid down on my work surface. I laid the zip loc bag over the top of the piece and secured it onto my work surface with tape. Using my Blendabilities, I randomly colored the portion of the plastic bag that covered the card stock. For the next step I sprayed the colored portion of the plastic bag and with glossy side down, I laid the piece of card stock onto the wet ink, patted it down and pulled it up. You can slide it, swirl it, shift it - each movement creates a different texture to the image.

After letting the ink dry, I stamped my image with Memento Black ink, hit it with my heat tool to dry and colored it with Blendabilities.

No two images will be the same. You almost have to wait to see how the image turns out before you can decide what to stamp on it. I made several backgrounds, simply wiping off the plastic bag before starting in once again. Warning! It can get a bit addictive!

Comment? I love to hear from you! If you have a question regarding this technique or just want to make my day - leave a comment below.

Blog Candy Coming Soon: I am closing in on my 150th blog post and there will be blog candy! 

Don't want to miss out? Enter your email address in the right column feed and my posts will be delivered directly to your mailbox.

Thanks for stopping. Hope it's a great day for you!

Sue


February 19, 2015

Pal's Challenge

Hi Stampers!

This week's PPA challenge was a fun one and easy to put together. Doing challenges does stretch me as a stamper and has increased my comfort level in going 'outside of my zone'. I'd love to do more of them, but for now, I'm committing to playing with the Pals each week.


As soon as I saw this layout, I saw stars - don't know why, but it just hit me. Does that ever happen to you? I love it when it does happen!

You could have so much fun using all different kinds of punches and shapes with this layout - try it and play along here.


Here's my challenge card. It will be sent off next week to another friend who is celebrating a birthday.

The DSP is from the Adventure Bound paper stack. It is the perfect DSP for masculine cards. The featured stamp set is Be The Star. Dimensionals for depth and a few candy dots for fun make this card complete.

TIP: Stamp on DSP! It gives a very different effect.

Be sure to stop back tomorrow for the last birthday card for this week and learn about my birthday partner.

Until next time, take gentle care,

Sue

February 18, 2015

Happy Birthday to Him!

When creating a card for someone, it's fun to personalize it when possible. Today's card has a story that goes along with it.


I CASEd this card from fellow Pal Susan Itell. When searching Pinterest, I found several golf related cards, but Susan's clean and simple style spoke to me!

My base is Whisper White and the main image is framed in Crumb Cake and Night of Navy. I used the large oval to punch a piece of Always Artichoke DSP. The cup is a 1/4" hole punch and the golf ball is made from a 1/2" punch. What a silly game! That big ball will NEVER go into that little hole - tee hee - I'll never tell!

Per Susan's instructions, I ran a scrap of Whisper White through the Big Shot using the Polka Dot Embossing folder. The flag is from a scap of Christmas paper. I initially trimmed it with the tree punch and then hand trimmed it to get it to an appropriate size. The line is drawn with a black marker. I also used Always Artichoke DSP to line the envelope.

TIP:  The layer sizes are as follows:  Night of Navy: 3 1/2" x 4 1/2", Crumb Cake: 4 1/4" x 3 1/4", Whisper White: 4 1/8 x 3 1/8".

So here's my walk down memory lane: My high school life revolved around music. Although I played the clarinet, my strength and love was singing. Carmen, the music director at my HS was responsible for the vocal and instrumental programs. He was tough and demanding, but we always performed exceptionally. Carmen and I stayed in touch after high school and beyond. I lost touch with him about 15 years ago. Last month, I was thinking about him as I often do and thought, "I need to track him down." It took me about 40 minutes on the computer and I located him in Arizona. So I picked up the phone and called! We talked for at least 30 minutes and have touched base via email weekly since then. Carmen is a big golfer, therefore my reason for seeking out this card. He and I share a birthday and I'm grateful that this year I can once again send him a birthday greeting.

TIP: When thinking about someone with whom you've lost touch, track 'em down, pick up the phone and call. It will be the bright spot in both of your days!


Check this out!


Thanks for stopping. Be sure to pop in tomorrow for the Pal's challenge!

Until next time, take gentle care,

Sue

February 17, 2015

Day 2 in Birthday Week!

Lots of birthdays this week!

I started a new job at the beginning of the month. One of the owners has a birthday this week. Although I don't know much about her yet,  after hearing the response to the Valentine treats, I figured she'd like this too.


The card I posted for a past PPA challenge, but the treat container is a new design. I matched the Pool Party paper and featured the Butterfly Basics stamp set. The sentiment is from Teeny Tiny Wishes and the butterfly on the sentiment is from Papillion Potpourri. I used my markers to color the flower and stem, gave the stamp a good "huff" and put it to paper.


I love these little mini coffee cups! This one is filled with Hershey kisses. The DSP is a vintage scrap I found in my files. Yummy coordinating ribbon finishes off the project.

TIP: Check out my photo tutorial on how to make this quick and easy holder for your mini coffee cups!

Stop back tomorrow for a masculine birthday card and take a quick trip with me down memory lane.

Stay in the know: Enter your email address in the column to the right so you can receive my blog updates automatically!

Like wha you see or have any questions? Leave a comment below; I love hearing from you!

Thanks so much for stopping. Hope your day is a great one!

Until next time, take gentle care,
Sue


Built for Free Using: My Stampin Blog

February 16, 2015

Happy Birthday to a special boy!

Today marks one year since my great nephew Jaxon, arrived into this world. There was quite a celebration today in Louisiana and those of us here in cold Wisconsin were certainly there in spirit.


Here's our big boy! His daddy played baseball in college and is determined to make a left handed pitcher out of this little guy. Fyi, Jax appears to be right hand dominant:) A baseball theme was deemed the winner for this shindig!


Anyone head over heals in love with a baby knows that a smile like this one just melts your heart! 

So, keeping with the theme and stepping outside the SU! border, this is the card I sent to celebrate. The inside read, "Hoping your first birthday is better than the winning grand slam in the bottom of the 9th!"

It had been awhile since I made a spinner card, but I couldn't pass this up and figured Jax could have some fun playing with it. 

TIP: If you've never made one, the secret is 2 pennies and dimensionals! 

Thanks for indulging me on Jax's big ONE. I've been a busy stamper, so be sure to stop back this week for more ideas and updates.

Don't want to miss anything? In the column on the right, you can enter your email address to have my post delivered to your mailbox. Take the click!

Thanks for stopping. Hoping your day is a great one.

Sue

February 14, 2015

Happy Valentine's Day!

Hi All,

A quick share of some of the Valentine's I sent out this year. I used the oh so popular Stacked With Love DSP along with the Snuggles and Smooches stamp set and stamps from the January Paper Pumpkin - that kit was amazing!! I can't wait to see what was sent I get in February! A 3 month PP subscription is available now at a $5 savings PLUS you can choose a FREE SAB item. Click here for PP details. Click here to purchase.

I admit that I'm a bit of a DSP hoarder and I'm trying to get better at using what I have. This is a great layout to showcase DSP.


I love red, black and white in a combination! The small swirl or rose from Snuggles and Smooches provided the perfect background for my feature panel. The DSP was fun to mix up. I layered the hearts to give some definition against the background and added some pearls for interest. The hearts are popped up with dimensionals.

Here's an alternate color choice:


On this card I colored some rhinestones using the Calypso Coral Blendability pen and adhered them.

and the inside....


This is the last card I made, a standard fold. Why would you do that Sue?, you might ask. Well, believe it or not, I was out of Real Red CS but found a piece already cut and scored. If you saw the pile of extra CS paper packs that I had, you'd be as surprised as I was - how could a person EVER run out of Real Red? So, now you know the rest of that story!


I ran the red hearts through the Polka Dot embossing folder. Because of that, I felt they needed no additional bling. The inside of this one is the same as the other red/black/white cards.

TIP:  Do you want to create the fun fold featured today? Cut your CS to 4 1/4 x 11. Score at 3 1/4 and 8 3/4. The base DSP panels measure 4 x 3, 2 x 2 1/2, 1 1/2 x 2. The center panel is 3 3/4 x 3 1/4 with a 3 1/2 x 3 layer. I added an extra layer in the R/B/W card, but you can figure that out. Break out your DSP and have some fun!

Hope you enjoyed today's post. I've been busy stamping, so be sure to stop back to check out new projects.

Don't miss out! To have my post delivered right to your email box, just enter your address in the field in the right column.

Hope your day is a good one! Until next time, take gentle care,

Sue


Built for Free Using: My Stampin Blog

February 13, 2015

Cookie Suckers


My son is currently a high school junior. His birthday is in August, so when he was in grade school I made a point of celebrating his half birthday in February. Because of Valentine's Day, I made a heart themed treat each year.

I started a new job last week and this week there was a pot luck lunch day. I hadn't made these treats since Michael was in 5th grade and thought they'd be fun.


I use my standard chocolate chip cookie dough and a Wilton heart shaped cookie pan. The pan is designed to hold the sucker stick. Once the cookies are cooled, I melt chocolate chips in the microwave, pour the melted chips into a zippety lock bag, snip a corner and pipe the chocolate onto the cookies.


I picked up clear, flat bags from a local store and stamped a vintage wreath in white craft ink, then added a few hearts using one of the Cherry Cobbler Blendabilities on the heart from Work of Art. The bags are tied with leftover Pretty in Pink satin ribbon - good way to use up that spool! I display the cookies in a heart shaped basket from Longaberger. The first time I made these, I carved a piece of styrofoam to fit inside the basket. It is covered with pink tissue paper. This basket is filled to half of what Michael used to take to school.

I had to chuckle when Michael walked into the kitchen and saw what I was making. He told me that kids still talk about getting these treats. I thought he was kidding, but he rattled off 4 names of people who had talked about these goofy cookies within the last month. Before he sat down to enjoy a cookie, he sent out a SnapChat photo! He received quite a few comments. As a mom, it's always good to know that the crazy stuff you did for your kids was memorable to someone! 

Oh, my peeps at work liked them too. I also filled a smaller matching basket with January Paper Pumpkin treats. I love taking fun treats. Several coworkers were going to give the Paper Pumpkin treats to their spouses for Valentine's Day! This was a FABULOUS Paper Pumpkin month! Through the end of March, purchase a 3 month subscription, save $5 off the regular price and get a FREE SAB item! Click here to purchase.

Thanks so much for stopping. Be sure to check back tomorrow to see the Valentine's I sent out to family and close friends.

Don't miss out! Enter your email address in the right column to have my posts delivered to your email box.

Until next time, take gentle care,

Sue


February 12, 2015

PPA Challenge

Take the challenge!

This week's challenge is a great masculine color trio. I saw a layout on Pinterest that I liked and this challenge fit the layout perfectly!


PPA239.png


I pulled out my Banner Framelits to create an interesting window and frame for this card. I stamped a piece of Whisper White CS using the Work of Art stamp set. I did add a couple stripes of Night of Navy to provide a needed pop of color for the background. The birthday sentiment is a FREE SAB item, available through the month of March with a $50 purchase. I can envision this layout in lots of fun colors!

Interested in taking the challenge? Check out the details here along with lots of other great projects using these colors.

Stop back tomorrow to check out the Valentine treats I made for my new coworkers!

Don't miss out! Be sure to enter your email address in the right column to have my updates delivered to your mailbox.

Make your day a good one!

Sue


Built for Free Using: My Stampin Blog

February 11, 2015

Pal's Blog Hop


Welcome to the February Pals Blog Hop. This month we are sharing what we love - our favorite Stampin' Up! products and our favorite crafting techniques.
You may just be starting the blog hop or may have come from Lisa Ann Bernard at Queen B Creations. Use the full lineup below to move along from blog to blog so you see all of the new projects.
I like to buy stamps that are versatile and fun to play with - that's what stamping is all about in my book! The Work of Art stamp set is one of my favorites. The possibilities with this set are ENDLESS!! If you don't own it yet, it really is a must have. Click on the photo at the bottom of my post to purchase the set. My March class will be featuring this stamp set.
My absolute favorite thing about Stampin' Up! products is the color coordination offered from card stock to ink to dsp and all the embellishments. If you like a monochromatic look, SU! product will give you stunning results.
Some stampers have difficulty putting together color schemes for their projects. SU! has a Color Coach that is a great tool. It gives you 2 trios of colors and one duo for most of the color options. It's kind of fun to pick a Color Coach card, any card and start creating! Don't own the Color Coach yet? Look no further than your catalog...
Another great resource for color combinations is your package of DSP!

TIP: When looking for color combinations for your project, go to your catalogs and check out the Designer Series Paper choices. Each DSP pack will list the colors used in the paper designs; pick any combo and you can't lose! Finish off your project with a 6'x6' piece of the coordinating DSP to line your envelope - it's definitely a WOW!
In this card I used Tangelo Twist, Night of Navy and Crushed Curry, all included in the Birthday Bash DSP. This card came together so quickly that I surprised myself! I finished it off with 3 Crushed Curry Candy Dots - an inexpensive way to add the perfect finishing touch to your projects.

Don't miss out! Enter your email address in the right column to automatically receive my blog updates in your mailbox. Like what you see? Please let me know, I love your comments!

Be sure to stop back tomorrow to check out the Pal's Paper Arts Challenge.
The next stop is Amy Hoptay at Inking of you  on the Pals Blog Hop! Thanks for visiting and I'll see you next month.

Until then, take gentle care,
Sue
  
                                  2015febhop_back                              

  1. Wendy Klein at Doggone Delightful Stampin'
  2. Jackie Diediker at Stampin' Jackie
  3. Natalie Bradley at Natalie Bradley Events
  4. Lisa Ann Bernard at Queen B Creations
  5. Sue Becker at RnR Stamping  YOU ARE HERE
  6. Amy Hoptay at Inking of you
  7. Beth Beard at My little craft blog
  8. Susan Lankford at Stamp and Create With Susan
  9. Susan Itell at Simple Stampin
  10. Rae Harper at WildWestPaperArts.com
  11. September Gray at www.septembergray.com
  12. Pamela Sadler at Stampin Pink Rose
  13. Becky Volpp at inkblossomwithbecky.com
  14. Beth McCullough at Stamping Mom
  15. Sherrie Gross at Stampin' Sunshine
  16. Brian King at Stamp with Brian
  17. Martie Pollard at The Crafty Bandit
  18. Maggie Mata at Maggie Made Cards
  19. Lynn Kolcun at Avery's Owlery
  20. Kalyn Shubnell at The Stamping Chronicles
  21. Dawn Tidd at Tiddbits from Dawn
  22. Amy Whelan at Amy's Inklings
  23. Karen Hallam at Karen's Blog
  24. Michelle Gleeson at StampinMojo
  25. Shannon K Jaramillo at Shannon Kay Paperie
  26. Peggy Noe at prettypapercards.com
  27. Candy Ford at Stamp Candy
  28. Jane Knudsen at see jane stamp
  29. Nicole Watt at Pixel Maven's Retreat
  30. Mary Fish at Stampin' Pretty
  31. Angela Curry at Kindred Stampers
Built for Free Using: My Stampin Blog

February 10, 2015

Weekly Deals and a new Photopolymer Stamp Set

Hi all!

A quick update before I head off to bed. Just want to share the newest photopolymer stamp set. Another one that I think I NEED:)


Don't you agree? There are so many projects running through my head! Click on the photo above to purchase this hot off the presses stamp set!


Weekly deals can be purchased by clicking on the photo above; you'll be taken directly to my 24/7 online store.

Thanks for stopping. Happy shopping!

Sue

February 8, 2015

Snuggles and Smooches!

Greetings all!

If you follow my blog, you may remember that my great-nephew and his mom came from Louisiana and spent a week at my house. I'm still missing my baby! For his first Valentine's Day, Stampin' Up! came out with Snuggles and Smooches, a new photopolymer set. How did they know that my favorite thing to do with my boy is to give him snuggles and smooches? I knew this set would be used for his Valentine!


I love this free standing pop up card; it really packs a WOW! The only concern with this type of card is hoping the recipient isn't too challenged when trying to figure out how to open it!


I created a panel for the back side that includes the message and my signature - and a few extra x's and o's!

I heat embossed all of the images on this card to provide some shine and texture to the project.

Because the main sentiment is literally, over the top, I made a lined envelope for a perfect fit.The Stacked with Love DSP Stack has been the number 1 seller in the Occasions catalog. It's not only perfect for Valentines, check it out on page 5 in the caddy and you'll see that one side of the paper is all black and white! Not your color choice? You can dress up most of the designs to compliment your project. See a previous post on how to color DSP. For only $6.95, this paper stack is a must have!

TIP: Emboss with Classic Ink! Although SU! sells many colors of embossing powders, Real Red isn't one of them. To emboss with Classic Ink, your ink pad needs to be very juicy. Have your clear embossing powder at the ready, stamp your image, cover with embossing powder (don't forget to use your embossing buddy!) and use your heat tool to set the image. Versamark has more 'staying power' and you don't have to be as quick to apply the embossing powder and heat, but Classic Ink does work!

TIP:  When re-inking my stamp pads, I apply ink to much of the pad surface and then use the back of a plastic spoon to evenly work the ink into the pad. I've seen people use popsicle sticks or even their bone folders, but do note that the ink will stain. I can usually wipe my spoon clean and set it aside for the next reinking project.

Don't miss a tip! Provide your email address in the right column and my posts will be 
delivered right to your mailbox.

I spent time this morning playing with a new photo editing tool. I'd love to hear what you think about today's project photo. Please leave a comment below! 

You will find a list of supplies used in this project below. To purchase, click on the photo and you will link directly to my 24/7 online store. Don't forget, with each $50 purchase, you can choose 1 item from the Sale-A-Bration catalog!

Thanks for stopping and until next time, take gentle care,

Sue


Built for Free Using: My Stampin Blog

February 4, 2015

Weekly Deals!

Check out this week's great buys!


Click the photo above to go to my 24/7 online store.

Thanks for stopping!

Sue

February 3, 2015

Perfect Note Card Holder

Greetings!

If you've been following my last posts, you've seen the beautiful note cards I made using the Butterfly Basics stamp set and Butterfly Thinlits. The cards needed to be shipped to my cousin so she could see them and then ship them to the birthday girl. I was in a bit of a quandry on how to package the cards so they would withstand the bumps and bruises of shipping.

Wood-Mount Stamp Cases to the rescue! The cases have a plastic sleeve that allows you to slide your trimmed paper between the  sleeve and the case - so simple!


Twelve cards and lined envelopes fit into the case with no problem and I had no worries about safely shipping it out.

I did pull out some vintage product to finish the case - some Certainly Celery DSP and ribbon. I again used the Butterfly Thinlits to very simply dress up the front cover and the sentiment comes from the Butterfly Basics set.

I didn't want to ship the case in an envelope and quickly figured out that it would fit perfectly in a Paper Pumpkin box!

Mission accomplished! I received a call from my cousin saying the cards are really too pretty to use. I certainly hope her friend uses them!!


I hope you've enjoyed this project. I had so much fun making these cards and sending them off. Knowing that something I created brought a smile to someone else just makes my day!

Last Sunday, I was thinking about my high school music director who became a good friend in my post high school years. I lost touch with him about 18 years ago. I sat down with my laptop and within 40 minutes I had located him in sunny Arizona, so I picked up the phone and called him. We gabbed for at least a half hour and I've received a couple emails from him this week. That call brought a smile to both of our faces and it certainly made my day!

This week, make a point of reaching out to someone with a card or a call. I could be a close friend or family member, a neighbor, a fellow church member who needs support or a service member. The cards you create not only bring you pleasure while you are making them, but receiving a hand crafted card will certainly make someone's day!

Thanks for stopping and until next time, take gentle care,

Sue


Full Cases Wood-Mount StampFull Cases Wood-Mount Stamp127551
Price$6.95
Buy additional cases for all of your existing wood-mount stamp sets. Cases stack perfectly with your clear-mount stamp cases. DVD-sized to fit in your existing shelves. 4 cases.